How to Install Windows 98
After you partition and format your hard disk, you can install Windows 98: 1. Insert the Windows 98 Startup disk in the floppy disk drive, and then restart your computer.
2. When the Windows 98 Startup menu is displayed, choose the Start computer with CD-ROM support option, and then press ENTER.
3. If CD-ROM support is provided by the generic drivers on the Startup disk, you receive one of the following messages, where X is the drive letter that is assigned to your CD-ROM drive:
Drive X: = Driver MSCD001
Drive X: = Driver OEMCD001
NOTE: If your CD-ROM drive is not available after you boot from the Windows 98 Startup disk, install the CD-ROM drivers that are included with your CD-ROM drive. For information about how to obtain and install the most current driver for your CD-ROM drive, view the documentation that is included with your device, or contact your hardware manufacturer.
4. Insert the Windows 98 CD-ROM in the CD-ROM drive, type the following command at a command prompt, and then press ENTER
X:\setup
where X is the drive letter that is assigned to your CD-ROM drive.
5. When you receive the following message, press ENTER, and then follow the instructions on the screen to complete the Setup procedure:
Please wait while the Setup initializes. Setup is now going to perform a routine check on your system. To continue press Enter.
HOW TO INSTALL THE WINDOWS 98 UPGRADE ON A NEW HARD DISK DRIVE
Last updated: 07/29/03
PROCEDURE. A simple solution to the problem is to "put the cart before the horse." That is, Install FAT32 on the new hard disk before installing Windows. Here's how (do the following steps at your own risk):
Preferably, before buying it, make sure your computer will support the new drive (LBA, cable, drive bays,, etc.). I am assuming here that both drives are IDE hard disks.
Make sure your old hard disk is in good condition. Run SpinRite, scandisk or chkdsk/f and fix any problems.
Back-up your old hard disk, or, at minimum, backup everything that is important: accounting data, documents, Internet Favorites, etc. In particular, back-up your CD-ROM driver, AUTOEXEC.BAT, and CONFIG.SYS.
Make and test a Windows 98 Startup floppy.
This can be done from the Windows 98 Upgrade CD without first installing Windows 98. Put the XCOPY files on the Startup Floppy (see my instructions) if you have Windows or Windows for Workgroups 3.x on your old hard disk, and you want to move the contents of the old hard disk to the new one and perform an upgrade on top of your old Windows (i.e., actually upgrade it). XCOPY cannot be used to move Windows 95 from an old disk to a new one, but XCOPY should be handy for moving application and data files.
Unfortunately, the Windows 95/98 XCOPY command will not copy system and hidden files when used from the DOS prompt. Also, in general, Windows 95/98 cannot be copied from one hard disk to another and work by simply copying files. There are other programs which claim to have the ability to move Windows 95 from one hard disk to another by copying files, but I don't use them. There are programs, such as Powerquest's PartitionMagic and Samantec's Ghost, which can copy an image of a partition on an old drive to a new drive and expand the partition on the new drive, and Windows will work if copied using this method. Western Digital WD DIAGS has this capability, albeit limited, as well.
Shut-down, power-off, unplug the power cord, and remove your old hard disk. Install your new hard disk as a master, single-drive.
To avoid a serious mistake, I always remove the old hard disk before running FDISK or FORMAT on a new one. I usually do not mount a new hard disk in a computer before completing the transfer of data from the old one. It's usually easier to plug and unplug cables when the drive is out of the case. Be sure to protect the bottom of the drive from shorting-out when laying it on the case or lay it on the case up-side-down.
Also, I usually remove all expansion boards from the computer except the display adapter and disconnect Zip drives, etc. Once Windows 98 and any motherboard-specific display adapter software is installed, I reinstall all of the expansion boards, etc., one-at-time.
Set-up your CMOS for the new drive. AMI and Award BIOS "Auto" should work on most new IDE drives.
Wednesday, December 5, 2007
Tuesday, December 4, 2007
installation and procedure (Windows 2000)
--------------------------------------------------------------------------------
During a standalone installation, hotfixes are applied to a computer that is already running Windows 2000. When you run the hotfix package, it automatically installs the updated system files and makes the necessary registry changes. After the computer is restarted (required only for some system files that are used during the installation), the installation is complete and Windows 2000 runs with an updated file set.
You can install hotfixes by running the hotfix package, which extracts the hotfix files and runs the Update.exe installation program. Update.exe then checks the service pack version you are currently using. If the service pack version was released before the hotfixes, and the language is the same, the Update.exe program installs the hotfixes automatically. If your service pack version was released after the hotfixes, the installation is not completed and an error message appears, stating that the version is incorrect.
Note
If your service pack version was released after the hotfixes, and you were completing an unattended installation (using either the /U or /Q option), Setup does not continue and no message appears.
If the language of the hotfixes does not match the language you have set up for Windows 2000, Setup does not continue. If there are no version conflicts, Setup continues the installation. The Update.exe program registers the hotfixes under the following registry keys:
HKEY_LOCAL_MACHINE \Software\Microsoft\WindowsNT\CurrentVersion\Hotfix\
KB######
HKEY_LOCAL_MACHINE \Software\Microsoft\Updates\Windows 2000\SP5\KB######
During the installation, information for removing the hotfixes is stored in a hidden folder named systemroot\$NtUninstallKB######$.For information about removing hotfixes, see Removing Windows 2000 Hotfixes later in this document.
The following sections describe how to install Windows hotfixes from a shared network distribution folder.
Standalone Installation Methods
There are several ways you can perform a standalone installation. These include running the Windows2000-KB######-x86-LLL.exe program manually with a combination of installation options, using Microsoft Systems Management Server (SMS), or using Microsoft Windows Installer.
You can distribute hotfixes either by using a shared network distribution folder or by downloading the hotfixes from the Web. Because this guide is intended primarily for corporate users, the standalone installation procedures in this guide focus on the shared network distribution method, which is the most common means of hotfix distribution for this audience.
The instructions in this section explain how to install hotfixes on computers that are already running Windows 2000.
Command-Line Options for the Hotfix Package
The following table identifies the command-line options that the hotfix package supports.
Command-line option Description
/F Forces other applications to close after installation is completed and before the computer restarts.
/N Does not back up files for removing hotfixes.
/Z Does not restart the computer after the installation is completed.
/Q Uses quiet mode; shows no user interface.
/U Uses unattended Setup mode. Requires no user interaction and shows only critical errors.
/L Lists installed hotfixes.
Installing Hotfixes on Computers Running Windows 2000
To install a single hotfix on a single computer
To install a Windows 2000 hotfix on a single computer, run the hotfix package on the computer that you want to update. The hotfix package is formatted as follows:
Windows2000-KB######-x86-LLL.exe
You can create a shared distribution folder on the network for the hotfix if you want to install it on more than one computer. The following procedure describes how to install one or more Windows 2000 hotfixes using this method.
Note
In the following procedure, Drive represents the drive of the network or computer where your distribution folder is located.
To install a hotfix by running a hotfix package from a shared distribution folder
Connect to the network or computer on which you want to create the distribution folder.
On the network or the computer, create a distribution folder for the hotfix files.
For example, to create a distribution folder named Hotfix, type the following:
mkdir Drive:\Hotfix
Navigate to the folder you want, right-click the folder, and then click Properties.
Click the Sharing tab, and then click Share This Folder.
In Share Name, enter a name for the folder.
Click Permissions, and then add permissions that allow users to install their hotfixes from this folder.
If you are using an NTFS file system partition, click the Security tab, confirm that the permissions listed there do not conflict with those on the Sharing tab, and then click OK.
Copy the Windows 2000 Hotfix package to the distribution folder that you created in step 2.
To install the hotfix from the shared network distribution folder, run:
Windows2000-KB######-x86-LLL.exe
For example, to install the hotfix from the distribution folder named Hotfix, you would type the following:
\\servername\sharename\Hotfix\Windows2000-KB######-x86-LLL.exe
Use the command-line options described in the table provided in the preceding section.
To ensure that your hotfixes take effect, restart your computer after you finish installing all of the hotfixes.
Installing Several Hotfixes Together
You can group multiple hotfixes together in a batch file and install them as a unit. This prevents you from having to restart your computer after each hotfix is installed.
The following code sample is a batch file that installs hotfixes and ensures that the correct files are replaced after the computer is restarted.
@echo off
setlocal
set PATHTOFIXES=Drive:\hotfix
%PATHTOFIXES%\Windows2000-KB######-x86-LLL.exe /Z /U
%PATHTOFIXES%\Windows2000-KB######-x86-LLL.exe /Z /U
%PATHTOFIXES%\Windows2000-KB######-x86-LLL.exe /Z /U
Important
To ensure that the hotfixes you installed take effect, restart the computer if the batch file does not automatically restart it for you.
The Combination Installation Back to Top
--------------------------------------------------------------------------------
The combination installation installs hotfixes and one or more of the following:
Windows 2000.
Windows 2000 service packs.
Additional software from Microsoft or other companies. This additional software might be included on a service pack CD.
This section provides instructions you can use to perform a combination installation that includes Windows 2000 and hotfixes in unattended Setup mode.
You can perform a combination installation by including the components that you want to install with the hotfixes as entries in the Svcpack.inf file. You can also choose to install SP4 at the same time.
Installing Windows 2000 with the Service Pack and Hotfixes
This section explains how to perform a combination installation of Windows 2000 integrated with the service pack and post-service pack hotfixes. It also explains how to copy to a shared distribution folder on your network each of the elements to be installed. This is part of preparing for a combination installation.
The combination installation makes it unnecessary for you to perform separate installations of Windows 2000, the service pack, or the Windows 2000 hotfixes.
Important
To install Windows 2000 with hotfixes, you must use the method described in this section.
Make sure that any hotfixes you install were released after the service pack version with which you want to install them. For more information about this, see article 290074, "Slipstreaming Earlier Fixes Into an Integrated Installation Share Breaks the Share," in the Microsoft Knowledge Base.
This process installs the Windows 2000 hotfixes during Windows 2000 Setup.
You cannot remove hotfixes that were installed by using the combination installation method unless you reinstall Windows 2000.
Preparing for the Combination Installation
Before you run Windows 2000 Setup to deploy the installation of Windows 2000, SP4, and hotfixes across a network, you must copy the installation files for Windows 2000 and the hotfixes to a shared distribution folder. You must then complete the additional steps described in the procedure, To create and set up the required folders and files, later in this section.
If you are an OEM, and you plan to install additional OEM files (for example, device driver, application, or component files) on the destination computers, create a \$1 subfolder within the \$OEM$ subfolder. The \$1 subfolder maps to systemdrive, the destination drive for the Windows 2000 combination installation.
Note
In the following procedure, Drive represents the drive name of the network or computer where your distribution folder is located.
To create and set up the required folders and files
Connect to the network or computer on which you want to create the distribution folder.
In the shared folder on the network, create a distribution folder for the Windows 2000 installation files. For example, to create a distribution folder named W2000, type the following:
mkdir Drive:\W2000\
Ensure that only the system administrator has full access to this folder. Other users should have only Read and Execute permissions.
To verify that you have assigned the appropriate permissions, use steps 3 through 7 in the preceding procedure, "To install a hotfix by running a hotfix package from a shared distribution folder."
Insert your Windows 2000 product CD into the CD-ROM drive, and then, using the following syntax, copy the contents of the CD to the distribution folder that you created in step 2:
xcopy /E /I /V D:\i386 Drive:\W2000\i386
Remove the Windows 2000 product CD from the CD-ROM drive, and then, to perform a combined installation that includes SP4, insert the service pack CD. Otherwise, to install hotfixes with Windows 2000 only, skip to step 7.
Apply the service pack source files to the Windows 2000 Installation files located in the folder named W2000\i386 by typing the following:
W2ksp4.exe /S:Drive:\W2000
Note
For a list of command-line options you can use with this command, see "Command-Line Options for Update.exe and W2ksp4," in Microsoft Windows 2000 Service Pack 4 Installation and Deployment Guide (SPDeploy.htm).
Edit Drive:\i386\dosnet.inf to add svcpack to the [OptionalSrcDirs] section as follows:
[OptionalSrcDirs]
uniproc
svcpack
Create a Drive:\i386\svcpack subfolder.
Copy the hotfix package (Windows2000-KB######-x86-LLL.exe ) to the Drive:\i386\svcpack folder by using the 8.3 naming format (KB######.exe), where ###### represents the actual hotfix number.
If you are deploying multiple hotfixes, copy and rename all of the hotfix executable files.
Expand the hotfix to a unique temporary location. For example, to expand the files to a folder called samplefolder, type the following:
Drive:\i386\svcpack\KB###### /X:Drive:\samplefolder
From samplefolder, for each hotfix, copy a catalog file (KB######.cat) and hotfix binary files (such as .exe, .dll, or .sys) as follows:
Copy KB######.cat to the Drive:\i386\svcpack folder. If you are deploying multiple hotfixes together, copy the catalog file from each of the hotfixes to be deployed. Each hotfix has a unique catalog file that you must copy in the format KB######.cat. Do not copy empty.cat.
If the same binary file exists in multiple hotfix packages, keep only the file with the highest version number.
For each binary file included in the package, determine whether the same file exists in the i386 folder. (You can usually identify these files in the shared folder by the underscore (_) at the end of each file name.) Delete these binary files that will be replaced in the i386 folder.
Copy the hotfix binary files and any subfolders for the hotfix to the i386 folder.
For example, i386\uniproc\* files in the hotfix must be copied to the i386\uniproc folder of the shared installation folder. You do not need to copy Update.exe, Update.inf, SPmsg.dll, SPcustom.dll, SPuninst.exe, Update.ver, or symbols files.
For each file copied in step 10 (except for KB######.cat), check Dosnet.inf to determine whether each hotfix binary file name is listed under the [Files] section. All files listed under [Files] are preceded by "d1,". This appears as follows:
d1,Filename
If a hotfix binary file name is not listed for each hotfix under the [Files] section, add an entry using the syntax:
d1,Filename.
For example, if a hotfix contains Win32k.sys, because Win32k.sys is not listed in Dosnet.inf, "d1,win32k.sys" must be added under the [Files] section of Dosnet.inf. This ensures that the hotfix version of Win32k.sys will be copied during Windows 2000 Setup.
Delete the Drive:\i386\Svcpack.in_ file.
Create a new Svcpack.inf file in Drive:\i386 by using the applicable following content, depending on whether you want to deploy a single hotfix or multiple hotfixes. (Replace ###### with the numbers for your hotfix .cat file).
To deploy a single hotfix, set up your file as follows:
[Version]
Signature="$Windows NT$"
MajorVersion=5
MinorVersion=0
BuildNumber=2195
[SetupData]
CatalogSubDir="\i386\svcpack"[ProductCatalogsToInstall]
KB######.cat
[SetupHotfixesToRun]
KB######.exe /options
The recommended options for hotfixes are /Q, /N, and /Z. These options prevent messages from being displayed on computers to which you are deploying the hotfixes. This makes the hotfix installation invisible to user.
To deploy multiple hotfixes, set up your file as follows:
If you are deploying multiple hotfixes simultaneously, add an entry for each hotfix under both [ProductCatalogsToInstall] and [SetupHotfixesToRun] (as shown in the example that follows).
The following lines illustrate how these sections they would appear for an installation in which multiple hotfixes are installed. If you are installing a service pack, you do not need to include details about the service pack because it is included in the installation, independent of this process.
[ProductCatalogsToInstall]
KB123456.cat
KB123478.cat
KB123490.cat
[SetupHotfixesToRun]
KB123456.exe /options
KB123478.exe /options
KB123490.exe /options
The recommended options for hotfixes are /Q, /N, and /Z.
Using Svcpack.inf to Deploy the Combination Installation
You can deploy Windows 2000 and the hotfixes to multiple computers from a shared distribution folder on a network. During the standard installation process, Windows 2000 Setup (Winnt.exe or Winnt32.exe in unattended Setup mode) installs the operating system and applies the hotfixes.
To deploy the installation
Customize Windows 2000 Setup, as necessary. For more information about how to do this, you can view Help by entering the following command from the deployment folder:
\i386\winnt32.exe /?
For more detailed information, see the Winnt32.exe command syntax topic in the Microsoft Windows 2000 Professional Resource Kit.
Run Windows 2000 Setup (Winnt.exe or Winnt32.exe in unattended Setup mode) to deploy the installation of Windows 2000 and the hotfixes to multiple computers from the shared distribution folder.
Removing Windows 2000 Hotfixes Back to Top
--------------------------------------------------------------------------------
You can use Add/Remove Programs in Control Panel to remove a Windows 2000 hotfix. You cannot remove hotfixes that were installed as part of a combination installation, however, unless you reinstall Windows 2000.
If you install multiple hotfixes that each replace the same files, and you want to return your computer to its original state, you must remove the most recently installed hotfix first, the next most recently installed hotfix second, and so on.
For example, assume that you installed HotfixA, then HotfixB, and then HotfixC, and they each replace the same file. To return your computer to the state it was in before you installed HotfixA, you must remove HotfixC first, followed by HotfixB, and then HotfixA. If you try to uninstall the hotfixes in the wrong order, a warning appears listing all hotfixes and programs installed since you installed the hotfix that you are trying to remove. If you proceed, these hotfixes and programs might not work correctly.
To remove a Windows 2000 hotfix
Click Start, point to Settings, and then click Control Panel.
Double-click Add/Remove Programs, click KB######, and then click Change/Remove.
Follow the instructions that appear on your screen.
installation and procedure (Windows Vista)
Notes
If you are using a fingerprint reader or other biometric device to log on to your computer, make sure you write down your password before upgrading. You must log on by typing your user name and password the first time that you use Windows after upgrading.
For detailed information about upgrading from language versions of Windows XP to Windows Vista, go to You cannot upgrade certain language versions of Windows XP to Windows Vista online.
1. Insert the Windows installation disc into your computer's DVD or CD drive. You must start Windows installation while running your existing version of Windows.
2. On the Install Windows page, click Install now.
Install Windows page
3. On the Get important updates for installation page, we recommend getting the latest updates to help ensure a successful installation and to help protect your computer against security threats. You will need an Internet connection to get installation updates.
4. On the Type your product key for activation page, we strongly recommend that you type your 25-character product key to help avoid problems during activation.
5. On the Please read the license terms page, if you accept the license terms, click I accept the license terms.
6. On the Which type of installation do you want? page, click Upgrade to begin the upgrade. You might see a compatibility report.
Which type of installation do you want? page
7. Follow the instructions.
Remember to reinstall antivirus software
After installing Windows, don't forget to enable existing, or install new, antivirus software.
To install Windows by performing a clean installation
You can use the following procedure when performing a clean installation of a 32-bit or 64-bit version of Windows Vista.
When you perform a clean installation, your existing version of Windows, including all of your files, settings, and programs, is automatically replaced. You can back up your files and settings, but you must manually reinstall your programs and restore backed-up files when the installation is done. For information about how to restore your files after a clean installation, go to How to restore your personal files after you perform a custom installation online.
Perform a clean installation if your computer has no operating system installed, or you want to delete your current operating system and replace it with Windows Vista, or you want to partition your hard disk and install Windows Vista on a specific partition.
Before you install Windows, check your hardware compatibility. Go to the Windows Vista Upgrade Advisor on the Microsoft website. Alternatively, you can run the Windows Vista Upgrade Advisor during installation by clicking Check compatibility online on the Install Windows page. If you start the installation from the installation disc, this link to the Windows Vista Upgrade Advisor does not appear on the Install Windows page.
NoteYou cannot install an upgrade copy of Windows Vista on a partition unless a copy of Windows 2000 or Windows XP is already installed on that partition. Depending on which version if Windows you are upgrading to and from, you might have to perform a clean installation.
1. Turn on your computer, insert the Windows installation disc into the computer's DVD or CD drive, and then do one of the following:
• If your computer already has an operating system installed, and if you do not want to create, extend, delete, or format partitions, go to step 2.
• If your computer does not have an operating system installed or if you want to create, extend, delete, or format partitions, you need to restart your computer with the installation disc inserted in your CD or DVD drive. This will cause your computer to start (or "boot") from the installation CD or DVD. If you are asked to press a key to boot from DVD or CD, press any key. If the Install Windows page appears, go to step 2.
If the Install Windows page does not appear and you're not asked to press a key to start from DVD or CD, you might have to specify that your computer use its DVD or CD drive as the startup device. This means that you need to set the DVD or CD drive to be the first startup device in the basic input/output system (BIOS). To learn how to do this, see Start Windows from a CD or DVD. After you select your DVD or CD drive as the startup device, restart your computer, and then start Windows from the installation DVD or CD as previously described.
2. On the Install Windows page, follow any instructions that are displayed, and then click Install now.
3. On the Get important updates for installation page, we recommend getting the latest updates to help ensure a successful installation and to help protect your computer against security threats. You will need an Internet connection to get installation updates.
4. On the Type your product key for activation page, we strongly recommend that you type your 25-character product key to help avoid problems during activation.
NoteIf you have an upgrade copy of a 32-bit version of Windows Vista, you will see a message telling you to restart your computer and start Windows installation from within your existing operating system.
5. On the Please read the license terms page, if you accept the license terms, click I accept the license terms.
6. On the Which type of installation do you want? page, click Custom.
NoteAfter you click Custom, if you have an upgrade copy of a 64-bit version of Windows Vista and do not have a version of Windows that can be upgraded, the installation cannot continue. You will need to install a copy of Windows 2000 or Windows XP to proceed with this installation method.
7. On the Where do you want to install Windows? page, select where you want to install Windows.
• If you don't partition your hard disk, click Next. The installation will start automatically. You might see a compatibility report that lists which programs and software drivers won't work after the installation. You can resolve any issues after the installation is complete.
• If you have an existing partition and want to have more than one operating system on the same computer, you can install Windows on a specific partition. (This is called a dual-boot or multiboot configuration.) If you do this, be sure to install Windows on a different partition from the partition where your current version of Windows is installed. To install Windows on an existing partition, select the partition you want to use, and then click Next to begin the installation. You might see a compatibility report.
• If you want to create, extend, delete, or format a partition, you must start Windows from the installation DVD or CD. If you did not begin the installation process this way, follow the instructions for starting Windows from the installation DVD or CD that appear in the first step of this procedure, and then follow the instructions on each screen. On the Where do you want to install Windows? page, click Drive options (advanced), click the option you want, and then follow the instructions. Click Next to begin the installation. You might see a compatibility report.
8. Follow the instructions.
NoteBe sure to enable existing, or install new, antivirus software after the installation is complete.
To reinstall Windows Vista
If you want to reinstall Windows Vista by performing a clean installation—possibly to restore the default Windows settings—here's how to do it. (If you're having a problem with Windows, first see What to do if Windows won't start correctly, which explains how to use the Windows installation disc to fix problems without completely reinstalling Windows.)
Back up your files before you begin reinstalling Windows, even if you're reinstalling Windows on a hard disk partition. A clean installation replaces the current version of Windows and all personal files.
1. Turn on your computer and insert the Windows Vista DVD or CD.
2. On the Install Windows page, follow any instructions that might appear, and then click Install now.
3. On the Get important updates for installation page, we recommend getting the latest updates to help ensure a successful installation and to help protect your computer against security threats. You will need an Internet connection to get installation updates.
4. On the Type your product key for activation page, we strongly recommend that you type your 25-character product key to help avoid problems during activation.
5. On the Please read the license terms page, if you accept the license terms, click I accept the license terms.
6. Follow the instructions on each page. On the Which type of installation do you want? page, click Custom.
7. On the Where do you want to install Windows? page, select the partition where you want to install Windows.
8. Click Next to begin the installation. You might see a compatibility report.
9. Follow the instructions.
Note
Be sure to enable existing, or install new, antivirus software after the installation is complete.
Windows XP installation and procedure
Installation process
Part 1: Begin the installation
1.
Insert the Windows XP CD into your computer and restart your computer.
2.
If prompted to start from the CD, press SPACEBAR. If you miss the prompt (it only appears for a few seconds), restart your computer to try again.

3.
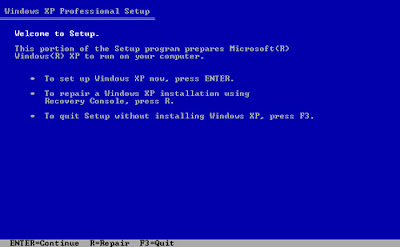
Windows XP Setup begins. During this portion of setup, your mouse will not work, so you must use the keyboard. On the Welcome to Setup page, press ENTER.
4.
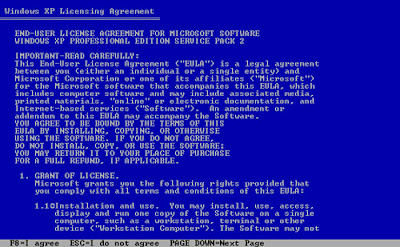
On the Windows XP Licensing Agreement page, read the licensing agreement. Press the PAGE DOWN key to scroll to the bottom of the agreement. Then press F8.
5.
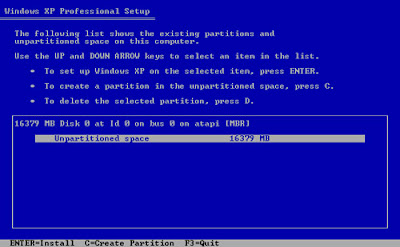
This page enables you to select the hard disk drive on which Windows XP will be installed. Once you complete this step, all data on your hard disk drive will be removed and cannot be recovered. It is extremely important that you have a recent backup copy of your files before continuing. When you have a backup copy, press D, and then press L when prompted. This deletes your existing data.
6.
Press ENTER to select Unpartitioned space, which appears by default.
7.
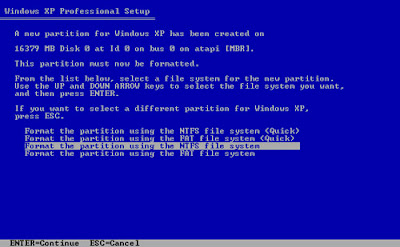
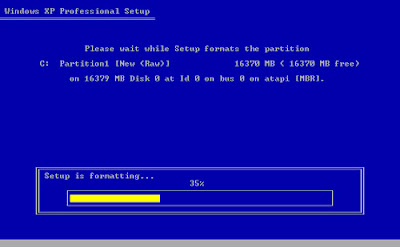
Press ENTER again to select Format the partition using the NTFS file system, which appears by default.
8.
Windows XP erases your hard disk drive using a process called formatting and then copies the setup files. You can leave your computer and return in 20 to 30 minutes.
Part 2: Continue the installation
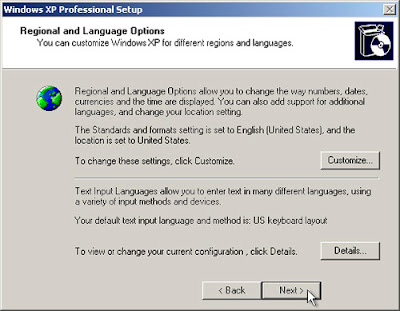
9.
Windows XP restarts and then continues with the installation process. From this point forward, you can use your mouse. Eventually, the Regional and Language Options page appears. Click Next to accept the default settings. If you are multilingual or prefer a language other than English, you can change language settings after setup is complete.
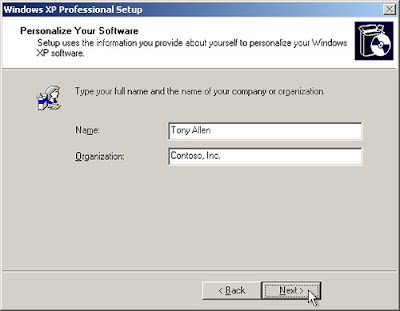
10.
On the Personalize Your Software page, type your name and your organization name. Some programs use this information to automatically fill in your name when required. Then, click Next.
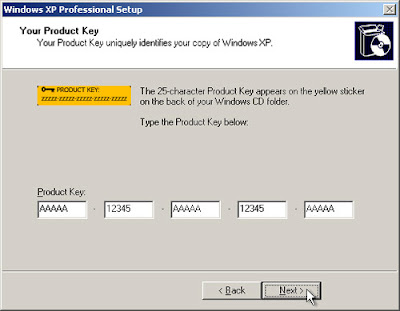
11.
On the Your Product Key page, type your product key as it appears on your Windows XP CD case. The product key is unique for every Windows XP installation. Then, click Next.
12.
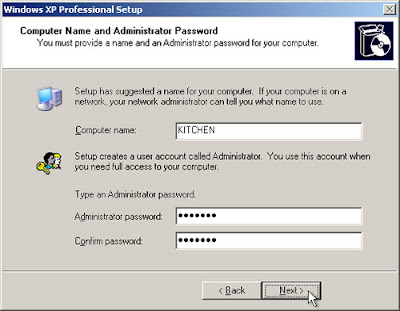
On the Computer Name and Administrator Password page, in the Computer name box, type a name that uniquely identifies your computer in your house, such as FAMILYROOM or TOMS. You cannot use spaces or punctuation. If you connect your computer to a network, you will use this computer name to find shared files and printers. Type a strong password that you can remember in the Administrator password box, and then retype it in the Confirm password box. Write the password down and store it in a secure place. Click Next.
13.
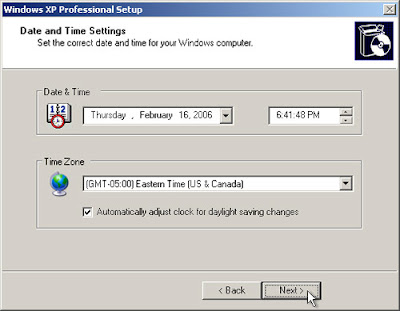
On the Date and Time Settings page, set your computer’s clock. Then, click the Time Zone down arrow, and select your time zone. Click Next.
14.
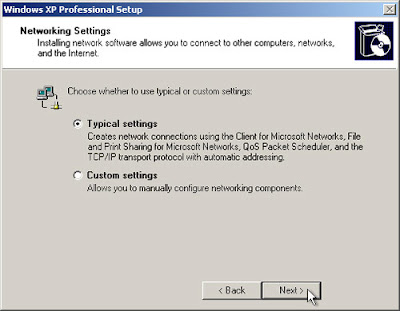
Windows XP will spend about a minute configuring your computer. On the Networking Settings page, click Next.
15.
On the Workgroup or Computer Domain page, click Next.

Part 3: Complete the installation
16.
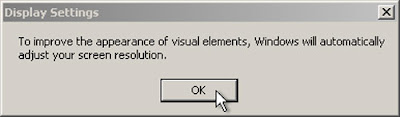
Windows XP will spend 20 or 30 minutes configuring your computer and will automatically restart when finished. When the Display Settings dialog appears, click OK.
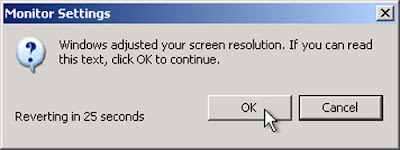
17.
When the Monitor Settings dialog box appears, click OK.
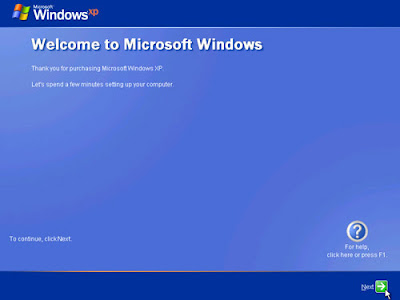
18.
The final stage of setup begins. On the Welcome to Microsoft Windows page, click Next.
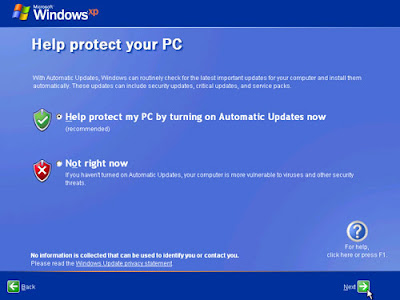
19.
On the Help protect your PC page, click Help protect my PC by turning on Automatic Updates now. Then, click Next.
20.
Windows XP will then check if you are connected to the Internet:
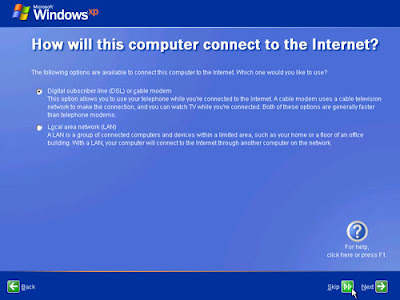
• If you are connected to the Internet, select the choice that describes your network connection on the Will this computer connect to the Internet directly, or through a network? page. If you’re not sure, accept the default selection, and click Next.
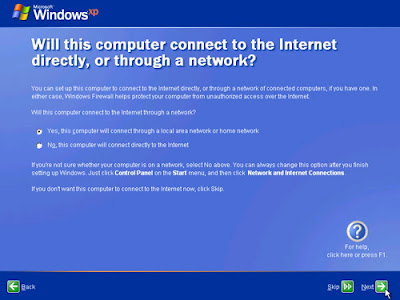
• If you use dial-up Internet access, or if Windows XP cannot connect to the Internet, you can connect to the Internet after setup is complete. On the How will this computer connect to the Internet? page, click Skip.
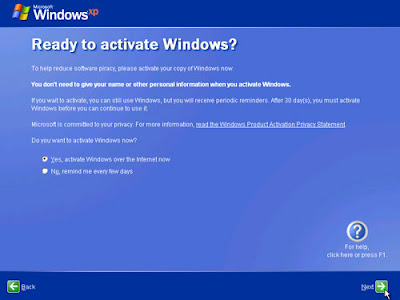
21.
Windows XP Setup displays the Ready to activate Windows? page. If you are connected to the Internet, click Yes, and then click Next. If you are not yet connected to the Internet, click No, click Next, and then skip to step 24. After setup is complete, Windows XP will automatically remind you to activate and register your copy of Windows XP.
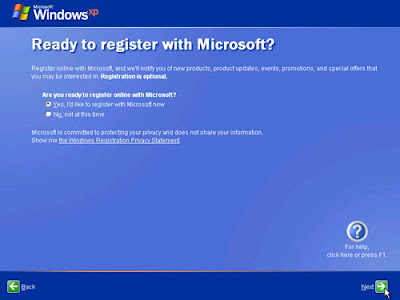
22.
On the Ready to register with Microsoft? page, click Yes, and then click Next.
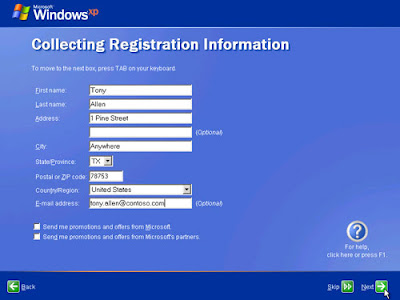
23.
On the Collecting Registration Information page, complete the form. Then, click Next.
24.
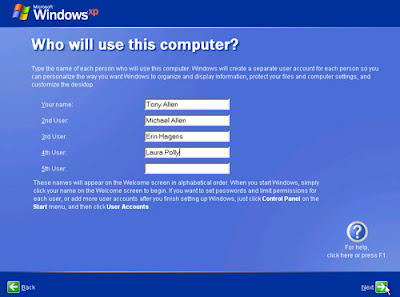
On the Who will use this computer? page, type the name of each person who will use the computer. You can use first names only, nicknames, or full names. Then click Next. To add users after setup is complete or to specify a password to keep your account private, read Create and customize user accounts.
25.
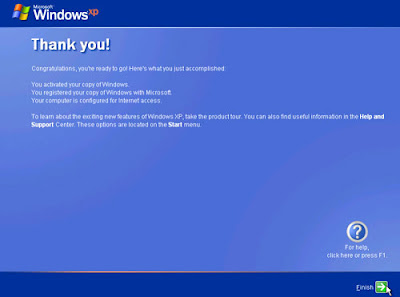
On the Thank you! page, click Finish.
Part 1: Begin the installation
1.
Insert the Windows XP CD into your computer and restart your computer.
2.
If prompted to start from the CD, press SPACEBAR. If you miss the prompt (it only appears for a few seconds), restart your computer to try again.

3.
Windows XP Setup begins. During this portion of setup, your mouse will not work, so you must use the keyboard. On the Welcome to Setup page, press ENTER.

4.
On the Windows XP Licensing Agreement page, read the licensing agreement. Press the PAGE DOWN key to scroll to the bottom of the agreement. Then press F8.

5.
This page enables you to select the hard disk drive on which Windows XP will be installed. Once you complete this step, all data on your hard disk drive will be removed and cannot be recovered. It is extremely important that you have a recent backup copy of your files before continuing. When you have a backup copy, press D, and then press L when prompted. This deletes your existing data.
6.
Press ENTER to select Unpartitioned space, which appears by default.

7.
Press ENTER again to select Format the partition using the NTFS file system, which appears by default.

8.
Windows XP erases your hard disk drive using a process called formatting and then copies the setup files. You can leave your computer and return in 20 to 30 minutes.

Part 2: Continue the installation
9.
Windows XP restarts and then continues with the installation process. From this point forward, you can use your mouse. Eventually, the Regional and Language Options page appears. Click Next to accept the default settings. If you are multilingual or prefer a language other than English, you can change language settings after setup is complete.

10.
On the Personalize Your Software page, type your name and your organization name. Some programs use this information to automatically fill in your name when required. Then, click Next.

11.
On the Your Product Key page, type your product key as it appears on your Windows XP CD case. The product key is unique for every Windows XP installation. Then, click Next.

12.
On the Computer Name and Administrator Password page, in the Computer name box, type a name that uniquely identifies your computer in your house, such as FAMILYROOM or TOMS. You cannot use spaces or punctuation. If you connect your computer to a network, you will use this computer name to find shared files and printers. Type a strong password that you can remember in the Administrator password box, and then retype it in the Confirm password box. Write the password down and store it in a secure place. Click Next.

13.
On the Date and Time Settings page, set your computer’s clock. Then, click the Time Zone down arrow, and select your time zone. Click Next.

14.
Windows XP will spend about a minute configuring your computer. On the Networking Settings page, click Next.

15.
On the Workgroup or Computer Domain page, click Next.

Part 3: Complete the installation
16.
Windows XP will spend 20 or 30 minutes configuring your computer and will automatically restart when finished. When the Display Settings dialog appears, click OK.

17.
When the Monitor Settings dialog box appears, click OK.

18.
The final stage of setup begins. On the Welcome to Microsoft Windows page, click Next.

19.
On the Help protect your PC page, click Help protect my PC by turning on Automatic Updates now. Then, click Next.

20.
Windows XP will then check if you are connected to the Internet:
• If you are connected to the Internet, select the choice that describes your network connection on the Will this computer connect to the Internet directly, or through a network? page. If you’re not sure, accept the default selection, and click Next.

• If you use dial-up Internet access, or if Windows XP cannot connect to the Internet, you can connect to the Internet after setup is complete. On the How will this computer connect to the Internet? page, click Skip.

21.
Windows XP Setup displays the Ready to activate Windows? page. If you are connected to the Internet, click Yes, and then click Next. If you are not yet connected to the Internet, click No, click Next, and then skip to step 24. After setup is complete, Windows XP will automatically remind you to activate and register your copy of Windows XP.

22.
On the Ready to register with Microsoft? page, click Yes, and then click Next.

23.
On the Collecting Registration Information page, complete the form. Then, click Next.

24.
On the Who will use this computer? page, type the name of each person who will use the computer. You can use first names only, nicknames, or full names. Then click Next. To add users after setup is complete or to specify a password to keep your account private, read Create and customize user accounts.

25.
On the Thank you! page, click Finish.

Subscribe to:
Posts (Atom)
